We help Microsoft-centric enterprises fully adopt the cloud & adapt to new ways of working.
\

CATEGORY

Articles

How you can make returning to the office work for everyone

The signs are encouraging, and although social distancing rules have relaxed, June 21st is still the date most firms are waiting on for aiming at to enact a return to the workplace in a meaningful way.

What do we mean by meaningful?

For many organisations it’s not just about getting as many people back into the office as possible whilst social distancing.

It’s about using office space in a new way that delivers true value to individuals, teams, and the company as a whole:

A space to concentrate working from home isn’t always the best place for individuals to be productive and focused.   For many staff members (especially those with young families) a visit to the office can offer a private desk with reduced noise and fewer distractions than they perhaps have at home.

An opportunity to collaborate properly with your team – When we are physically together, it’s easier to avoid distractions and focus on group tasks. 

Getting access to resources – Not having convenient access to the equipment you need to do your job can seriously hamper productivity:  High resolution scanners, colour printers, shredders, etc.

Learning on the job –  One of the main concerns raised by Goldman Sachs boss David Solomon was around new recruits who wouldn’t get the “direct mentorship” they need.

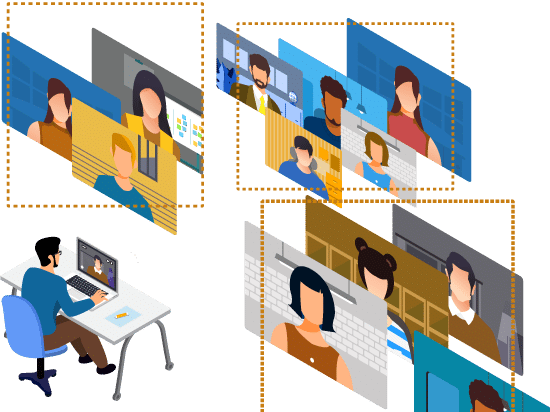
In person training – Although Teams provides a great platform for virtual in-person training (VILT) you can’t beat real breakout rooms.

Team building – Face-to-face interaction enables us to get to know each other informally, build deeper connections and gain a shared understanding that have a positive impact on subsequent virtual meetings.

Cross fertilisation of ideas – that serendipitous water cooler moment, as industry analysts are calling it, when co-workers or employees in completely different parts of the company connect and spark creativity and innovation.

Wellbeing – The impact of being able to meet colleagues in person cannot be underestimated.  While many have thrived in a lockdown working situation, for some people the workplace is a key source of social interaction that has been missing for over a year.  

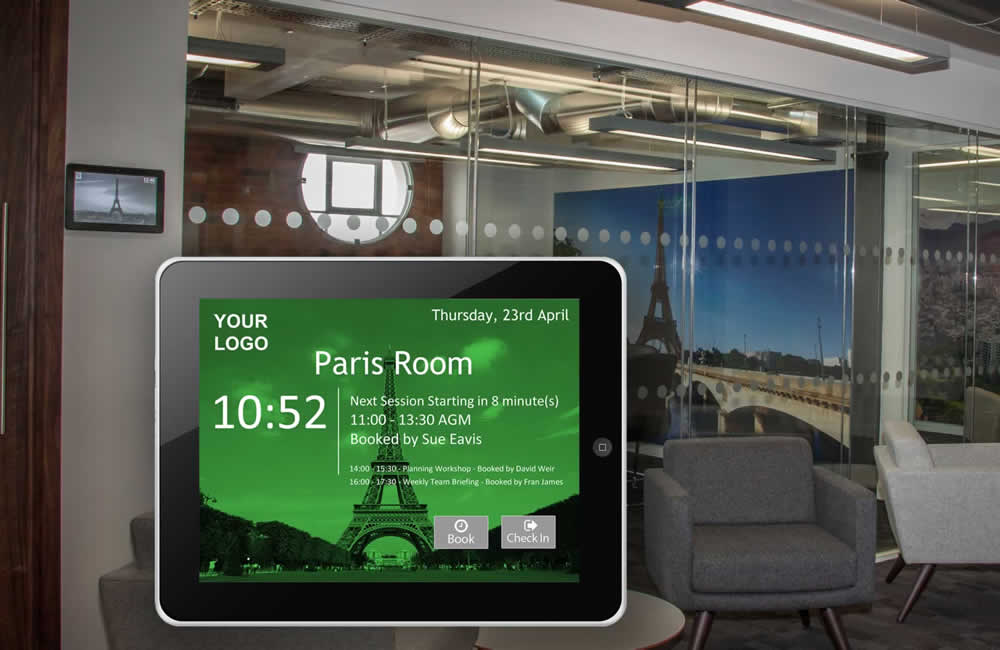
See below for our quick summary on what to look for in a ‘next generation’ workspace booking solution to help you return to the ‘new format’ office.

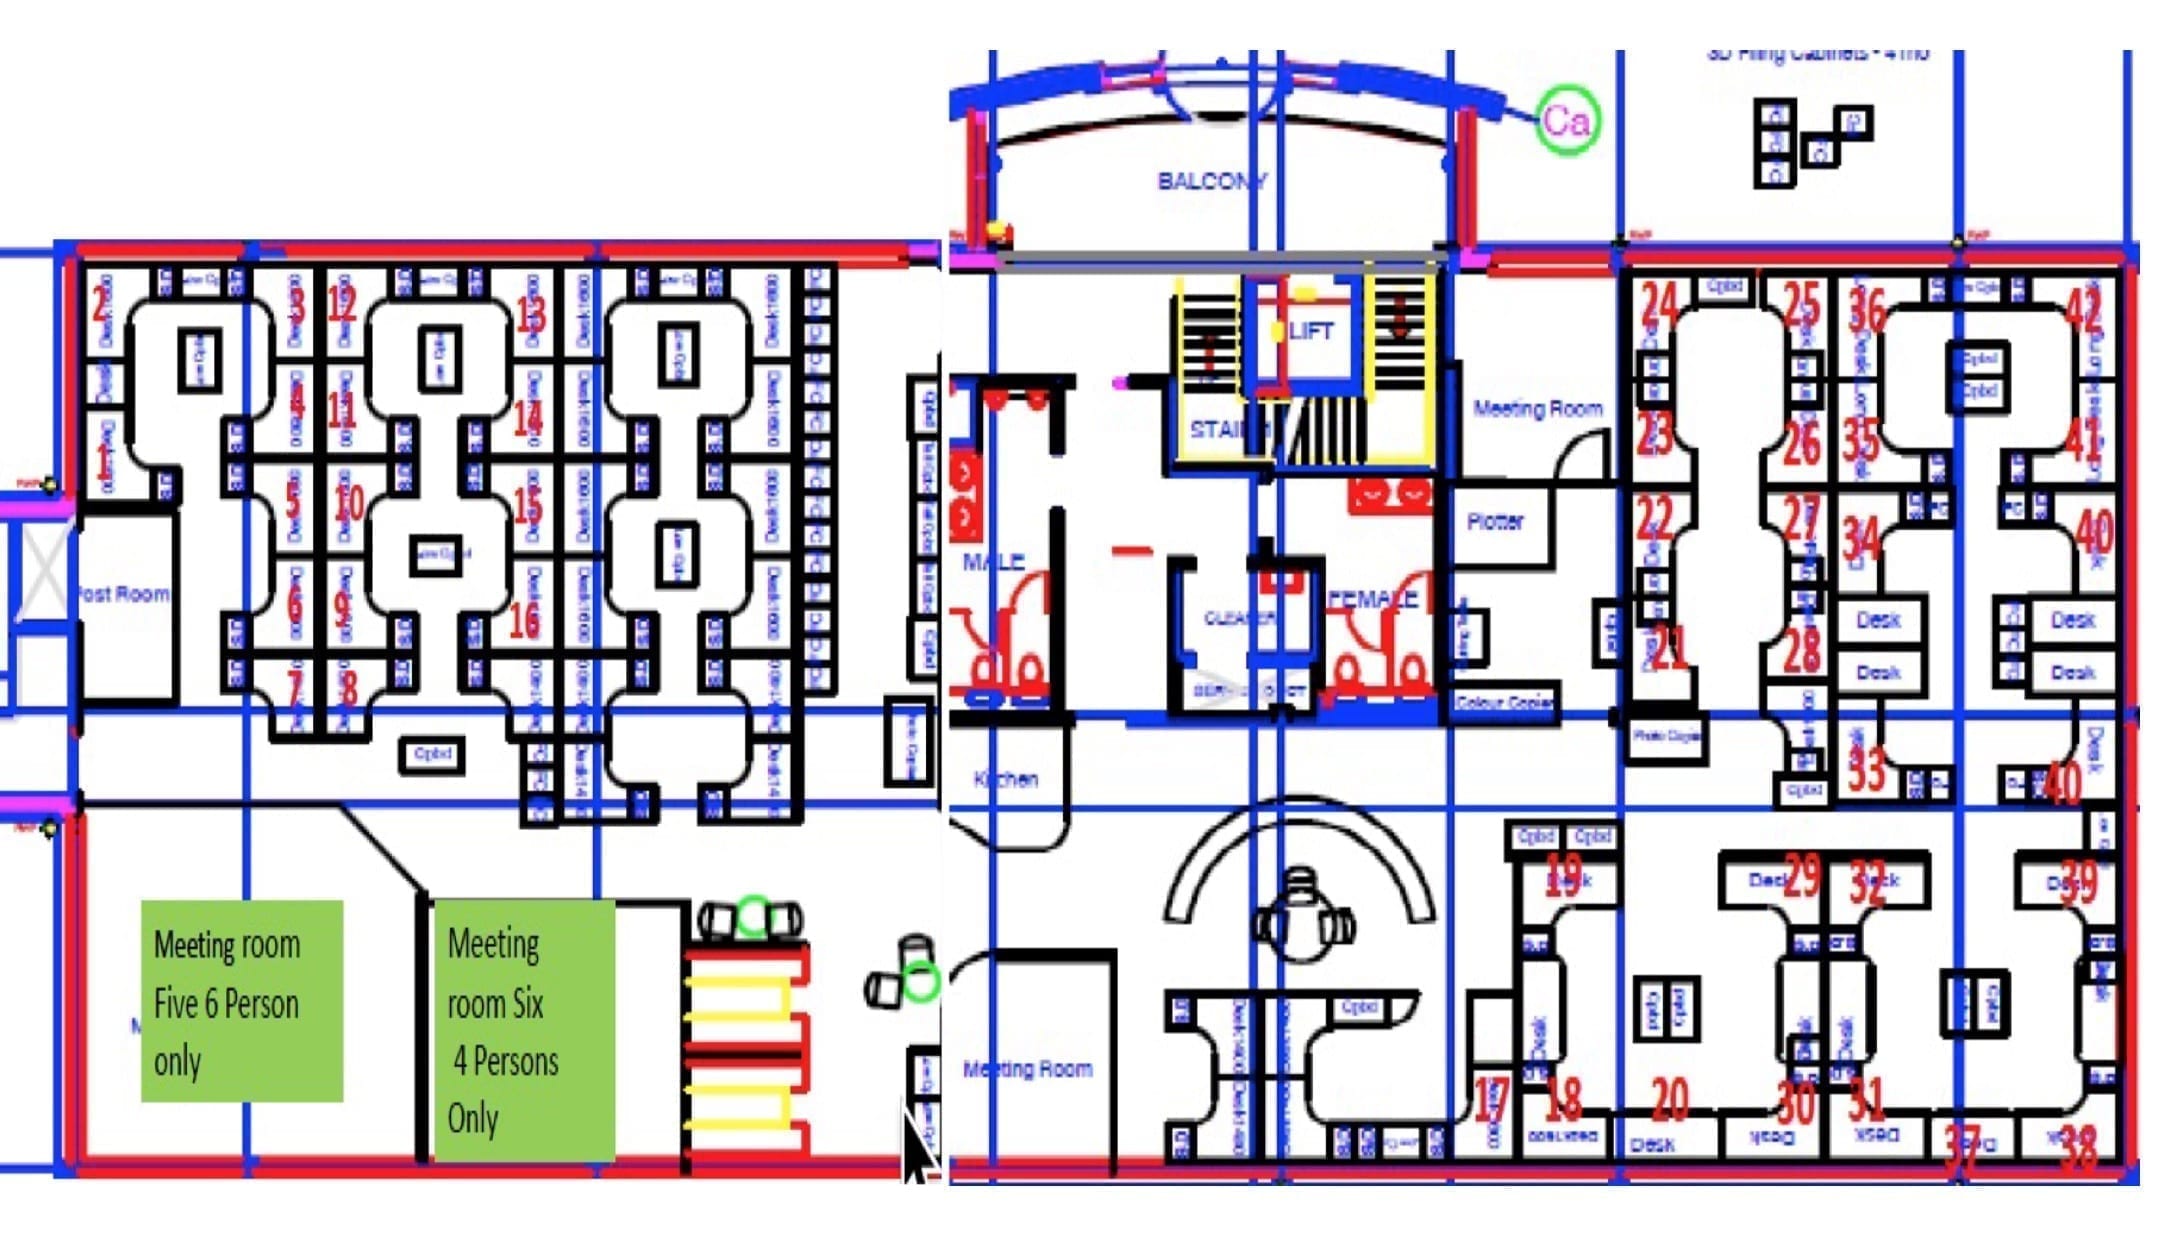
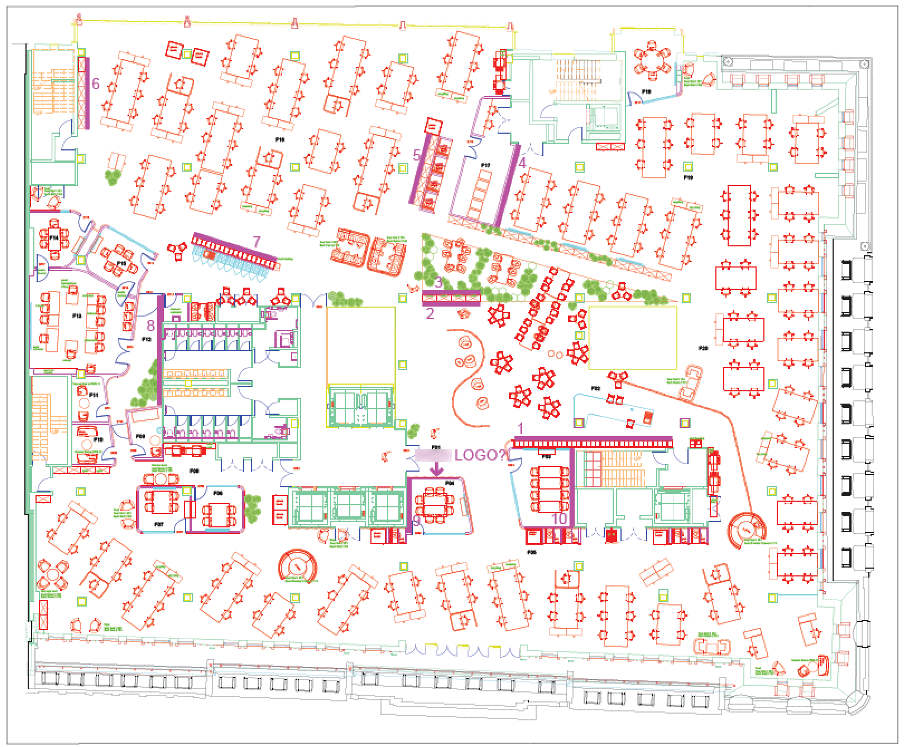
The ‘new format’ office

With this in mind, many organisations have taken the opportunity to re-format their offices:  

  • Providing a variety of different workspaces that employees can choose from, depending on the task at hand.
  • Creating clusters of various types of space into a neighbourhood or zone where teams working on a certain project or in a particular department can gather.
  • Providing multi-media resources: Video Conferencing screens, white boards
  • Investing in a great-looking, funky workspace that offers value add over a regular office, creches, yoga classes and more, with staff well-being front of mind.

What’s counter-productive to the new workspace is:

  • Having to get in extra early in the morning and be part of a mad scrum to get the workspace you want
  • Being unfamiliar with the new office layout
  • Folk hogging the same desk/resources day in, day out
  • Struggling to get your team into the office on the same day and seated in the same area.

This is where a workspace booking system can help.

Below are some of the scenarios you should expect to support with a next generation workspace booking system:

First off – this is how your workforce should be benefiting:

For your workforce Solution features (that make this possible)
Make it easy to find a workspace with the optimal facilities for their planned office visit
  • Convenient workspace booking from Outlook, web or mobile (Android or iPhone)
  • Selection from an interactive floor plan that gives visibility at-a-glance
  • Search & selection filtering according to workspace attributes such as riser desk, docking station, quiet space, multiple screens, accessibility, etc.
Build confidence that their visit will be COVID-safe.
  • Automatically block out adjacent desks when a workspace is booked, or
  • Make only pre-designated, safely-spaced workspaces bookable
  • Show the location of hand sanitisers, occupancy limits & flow of direction on interactive floor plans.
Make it easy to book a workspace for collaboration.
  • Clearly display team zones/neighbourhoods on an interactive floor plan
  • Enable filtering of available spaces according to teams/departments
  • Book workspaces for yourself & (named) team members at the same time
  • Find where a co-worker has already booked a workspace & book a desk nearby for yourself.
Offer additional resources to ‘ease’ their visit
  • Book a range of ‘supporting services’ that may be available, such as a parking slot, catering, visitor passes, an AV support technician, creche space, yoga class (!) etc, at the same time as scheduling your visit.

This is what facilities managers should be able to do:

For your Facilities Team Solution features (that make this possible)
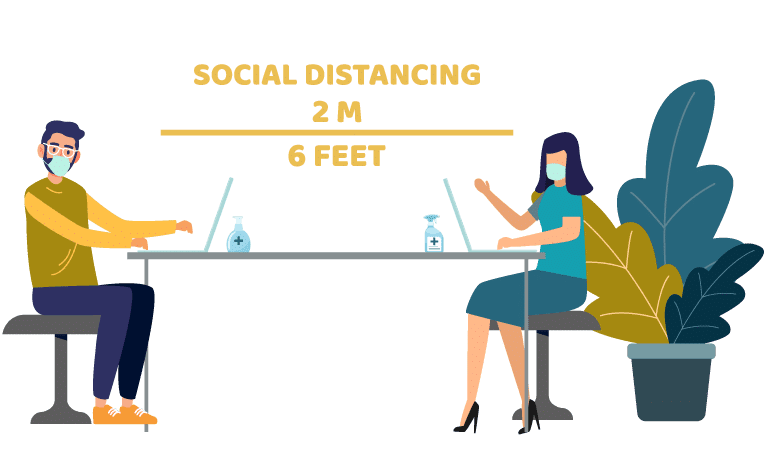
Ensure social-distancing and/or address the fact that you have may significantly downsized your office space.  
  • Throttle how many people can come into the office at once
  • Automatically block any additional workspace bookings when you reach a pre-determined number for a given day
  • Get staff to book a ‘daily visit pass’ & limit the amount of passes you have
  • Create policies that allow you to avoid ‘peaks’ mid-week (& empty offices on a Monday & Friday).
Designate team areas
  • Earmark workspaces for different teams for different days of the week or as required
  • Prioritise bookings for that team until a pre-defined cut-off point (e.g., 24 hours in advance).
Understand workforce needs
  • Make office visits subject to approval by a line manager
  • Use questionnaires to determine the reason for a visit to understand trends.
Prevent resource hogging
  • Stop the same person booking the same workspace according to parameters you define.
Spread office attendance across the week
  • Create policies that allow you to avoid ‘peaks’ mid-week.
Share resources equally
  • Limit how long or how many times in a given timeframe an individual can book a limited resource – such as a video conferencing suite.
Maintain track & trace information
  • Enforce check-in on arrival to get an accurate view of who’s sat where
  • Generate reports to support track & trace activity in event of a reported COVID-19 infection.
Schedule between use cleaning
  • Automatically create cleaning schedules &/or send notifications to facilities staff on check-out or end of session
  • Only allow one use per day to allow for daily cleaning.
Keep visitors safe
  • Enforce registration of visitor contact details to support your COVID-19 response
  • Automatically send visitors safety information in advance of their arrival
  • Provide visitor information for your front desk & security staff.
Understand utilisation patterns 
  • Track workspace utilisation accurately
  • See what workspaces are popular, understand peak demand.
Easily revise COVID-19 measures in the event of change (e.g. in the winter months)
  • Make it easy to respond to change in Government advice with flexible policies that include the ability to:
    – Recalibrate auto-safe zoning (e.g., change from 1m back up to 2m)
    – Revise & enforce the number of people that can come into the office each day.

And this is where the business as a whole should benefit:

For the Business Solution features (that make this possible)
Help your workforce feel confident to return to the office & reinforce the measures you are taking to keep your workforce safe. 
  • Deliver an easy to use desk booking system that’s accessible from Outlook, web or mobile devices
  • Use selection filters & graphics that enable staff to quickly find the best workspace for their office visit
  • Inbuilt COVID-safe functionality such as auto-distancing & interactive maps with traffic flow indicators, hand sanitiser locations, etc.
Foster healthy group interaction
  • Make it easy for workers to book a group space.  E.g. enable an individual to make a booking of a multiple spaces on behalf of co-workers
  • Clearly indicate collaboration zones & team/departmental spaces & neighborhoods
  • Earmark & prioritise bookings for different groups on different days.
Reap the rewards of spontaneous new connections across your workforce  
  • Create rules to prevent individuals from booking the same desk repeatedly.
Attract & retain talent
  • Provide an agile workplace management system that will help your business demonstrate your values
  • Make it easy for staff to locate their nearest office space, find the best workspace & resources for their needs & feel immediately comfortable coming into an unfamiliar office.
Understand the views & needs of your workforce & adapt your office space accordingly.
  • Regularly poll your workforce to understand their plans on returning to the office & the kind of workspaces they need
  • Understand exactly how your workspace is being used: Are certain types of workspace favoured over others?  Are some workspaces being under-used?

See these capabilities & more in action:

Request a personalised product demo or
join our webinar which explores this area in more detail

FACT: If you migrate legacy shortcuts into Exchange Online, it’s highly likely they’ll ‘still work’ if your archive remains on-premises

If you move shortcuts along with regular emails as you migrate mailboxes to Office 365, nine time out of ten they will still work: 

That is to say, when you double click on the shortcut, the original full email will be retrieved across the network from the on prem archive.

For example, with Enterprise Vault (EV), a user can still recall/retrieve old, archived email items using EV shortcuts. They can also use the EV Search service to access and search their archived emails as part of integrated search within the Outlook client or via a web URL in a browser.

The downside is that post-migration:

  • you can’t archive anything new in EV 
  • you can’t use web access to access the shortcuts (as Veritas doesn’t control the OWA servers)
  • end users cannot restore or delete archived email items from shortcuts

Other archive vendors may behave similarly.

There are a number of other downsides:

It’s unsupported

Microsoft won’t support this set up – why should they?  As indicated above – the archive vendor cannot control the Microsoft environment and will therefore be limited in what it can offer.

Over time, your on-prem archive will become unreliable and expensive

“Although shortcuts to archived emails would still work across the network after we migrated to Microsoft 365, the prospect of maintaining a dedicated email archive on-premises was a non-starter.  The SAN it used was becoming increasingly unreliable and the overheads of maintaining it were costly.”

According to Stephen Appleby of An Post, the state-owned provider of postal services in the Republic of Ireland, “Although shortcuts to archived emails would still work across the network after we migrated to Microsoft 365, the prospect of maintaining a dedicated email archive on-premises was a non-starter.  The SAN it used was becoming increasingly unreliable and the overheads of maintaining it were costly.”

Not surprisingly, COVID-19 has also highlighted the challenges of maintaining and backing up systems that are sitting in a server room in the office.

Annual software maintenance and support costs can also escalate, and high costs don’t necessarily mean you get a high-quality service in return. 

For example, EAS, one of the first email archiving solutions on the market, has effectively ‘changed hands’ five times (from Educom – Zantaz – Autonomy – HP – Capax ….. ) Other solutions have become similarly acquired and/or merged into an existing portfolio, with each change risking an uncertain roadmap and lack of focus on development and support from the new ‘owner’.

You’ll have a separate place in which you’ll need to manage retention and eDiscovery

On-premises archives (and to some extent, hosted archives) are of a ‘technical’ nature when it comes to implementing retention policies and performing eDiscovery. 

It’s likely the IT department will still need to manage retention policies and do eDiscovery. 

We frequently encounter IT teams that spend hours responding to eDiscovery requests.  For example, a client using EAS found its eDiscovery service was simply not up to the job for the volumes they had, with searches taking hours and hours to execute.  The suggestion on the part of the archive vendor was to beef up the IDOL search servers available – something that would have been prohibitively expensive.

Likewise, the job of implementing retention policies typically falls on the shoulders of the IT team, with little guidance on deletion policies from the legal department.

The great news is that Microsoft 365 offers a compliance and eDiscovery capability that is becoming super-user-friendly, to the point that you can now shift responsibility for compliance-related activities OUT of the IT department.

The other big benefit of moving the contents of legacy archives into Microsoft 365 is that you can perform eDiscovery in one location.  Having multiple different locations to search and then reconcile introduces both time and risk, which brings us onto the next issue:

Ultimately, is it worth having a separate archive?

Those in the business of providing dedicated email archive services would, of course, argue for the need to have a separate archive in the cloud.

For example, there are Veritas partners that offer services to host the storage component or your entire EV environment in Azure.

Also some vendors offer a cloud-based version of their previously on-premises archive.  For example, you can migrate EV into Veritas’ hosted service, Enterprise Vault.cloud.

There are also hosted archiving services from organisations like Mimecast and HubStor (now part of Veritas).

This is where the blurring of the boundaries between archiving and backup come into play and that is a separate subject again.

Another factor with each of these approaches is that they require some form of change on the end-user’s view – i.e. the concept and convenience of shortcuts goes away.

Why you should move your archives to Microsoft 365

Unlimited capacity

The storage capacity benefits of using a separate archive have fallen by the wayside with Microsoft 365.  There’s very few email users whose mailbox and historic archives can’t be accommodated by Microsoft 365 licencing:

  • A Primary Mailbox can grow up to 100GB (E3 and above)
  • An Archive mailbox in theory has no cap on it

No charge for leavers

If you have archived mailboxes belonging to leavers, you can take advantage of inactive mailboxes and place them litigation hold (or specifying an appropriate retention policy) to retain their emails indefinitely (or as required) without incurring a licence penalty.  

The average ration of ‘leavers’ to ‘current staff’ archive mailboxes in the typical archive can be as much as 4:1, so this amounts to a significant cost saving.

Advanced Compliance Capability

As we said earlier, the compliance and eDiscovery capability now available in Microsoft 365 is ‘up to the job’ of handling most information requests and data protection needs.  Importantly – Microsoft’s trajectory is to provide services that don’t need as much input from the IT department.

If that is enough to compel you to shut down your on-prem or hosted dedicated, third-party archive completely and, ideally, get the contents of your archive into Microsoft 365, this is what you need to know:

Successfully migrating email archives into Microsoft 365 requires care (there is no real shortcut)

Migrating the contents of a legacy archive into Microsoft 365 is a speciality for Essential and something we’ve been doing since 2005.

One thing you’ll discover is that there are a few different routes you can take.  

For example:

  • Do you migrate shortcuts into online mailboxes using mailbox moves, and then replace them with the corresponding archived item later?
  • Do you migrate archives first?
  • Where do you put emails that users have deleted from their archive (but are still in the archive)?
  • How do you treat mailboxes that are too big according to Microsoft’s licencing rules and throttling measures?  This can become an issue when you ‘re-hydrate’ a shortcut with a much bigger archived item.
  • What about shared mailboxes, public folders and journal archives?

The answer to each of these questions will vary depending on a lot of things, including the capabilities of the archive you’re moving from.

For example, HP ACA and AXS-One are archives that need extra care and steps to ensure the best compliance and end user outcomes

“Essential worked out the best strategy for migrating our archived emails into Exchange Online.  We received top notch documentation from Essential’s consultant, Toni Mallin, and this enabled us to complete our own migration with very little assistance.” 

According to An Post, whose legacy archive used HP’s ACA (Autonomy Consolidated Archive), “Essential worked out the best strategy for migrating our archived emails into Exchange Online.  We received top notch documentation from Essential’s consultant, Toni Mallin, and this enabled us to complete our own migration with very little assistance.” 

As with An Post, the cost of a migration is always a consideration and we are able to offer a service that enables your IT team to easily oversee elements of the migration and reduce costs.

One thing for sure is that the cost of migration will be significantly less than maintaining an on-prem archive and performing countless eDiscovery searches.

Find out more about our email archive migration services.

Request a personalised full product demo

As COVID-19-related restrictions are slowly easing around the world, many businesses are preparing to return to the workplace.

However, the (as yet) unknown effects of emerging from lockdown and the ongoing threat of new variants conspire to make employees nervous about increasing their potential exposure by coming back into the office.

For those employees willing and able to consider returning to the workplace, businesses have a legal and ethical duty to create the safest possible work environment.

So how do you create a workplace that not only supports social distancing and keeps people healthy, but also reassures them that they’ll be safe when they come into the office?

This is where a workspace management solution can help.

Ensure socially distanced workspaces

Preventing staff from sitting cheek by jowl or clustering in meeting rooms is a challenge of slightly larger proportions, particularly if you’re dealing with limited floorspace.

Modern, configurable resource booking solutions can be very helpful in maximising the safe use of the facilities that you have, by:

  • Enabling employees to easily pre-book a workspace securely from any device or browser
  • Ensuring desks are never booked side-by-side unless there is sufficient spacing
  • Limiting meeting room occupancy
  • Repurposing meeting rooms as extra workspaces if necessary
  • Flagging desks with specific attributes like standing desks, accessible desks, multiple screens, multiple docking stations etc.

Pro tip: As you plan your seating assignment, having a future-proof numbering scheme is vital.

See also how technology can help with ensuring socially distanced steps in this video.

Throttle arrival and departure times

One of the easiest ways to do this is to stagger arrival, departure and break times.

This minimises the number of employees sharing lifts, stairwells and exits, and prevents overcrowding in ‘pause spaces’, and kitchens.

Depending on the size of your business, you may need to embrace shift work to achieve this.

Certainly, a booking solution can help switch up the time slots that can be booked to help avoid pinch points.

Apply strategic seating policies

Above and beyond safe distancing, it’s also a good idea to apply a few strategic seating policies via your resource booking solution.

For example:

  • Preventing critical employees from sitting in the same area together.  In the event of an outbreak, this will help an entire team needing to be quarantined at the same time.
  • Avoiding staff members booking the same workspace all the time.  As well as being a measure to prevent staff members from hogging resources, many organisations are seeing ‘hot desking’ as a way to improve cross-departmental collaboration and relationships (this will be the subject of another blog article).
  • Limiting the length of time a ‘scarce’ workspace can be used to give everyone a ‘fair share’.  A good example of this is a meeting room that has high-end VC equipment or other expensive resources.

Know who’s been in the office

Pre-booking workspaces, and then, on arrival, enforcing an authenticated (yet contactless) check-in to that workspace, is a great way of capturing accurate information on who’s been in the office.

See also section on visitors below.

Manage between-use cleaning

Sanitising workstations between users is vital to prevent the potential spread of infection. If you have cleaning staff on hand, consider using your resource booking tool to prevent successive bookings of the same desk, or enforce a short window between users to allow time for a deep clean.

If you don’t have a permanent cleaning team, a resource booking system can still help by reminding users to sanitise their workspace when they sign out of their desk for the day.

Track and trace potential infections

In the event that someone falls ill, your resource booking tool can be invaluable in tracking and tracing any potential infection chains with a complete record of every desk, meeting room and parking space that employee has used in recent days.

It’ll also be able to tell you who else used the same facilities or was seated near enough to potentially be at risk.

Enable booking of parking spaces

With infection rates still relatively high and new variants a constant risk, it’s likely that people will be wary of using public transport for the foreseeable future.

Just like with desks and meeting rooms, an automated resource-booking system can be invaluable in making the most of the parking space you have by:

  • Enabling ‘hot parking’ – assigning bays dynamically on a daily/weekly pre-booking basis
  • Staggering parking bays assigned to employees starting or leaving work at the same time
  • Returning bays to the parking pool if employees:
    • have not signed into their desk for the day (off sick or working remotely)
    • leave work early
    • are on leave
  • Keeping security informed of who is where, and when (including visitors)
  • Giving staff members that are worried about travelling by public transport peace of mind that they will have a safe place to park on arrival.

Keep visitors safe

Employees aren’t the only people you need to keep safe on your premises.

Visitor’s movements also need to be managed for social distancing reasons.

Consider using your resource booking tool to assign passes to restrict visitor numbers, pre-book meeting rooms and make appropriate parking available to ensure safe and easy entry and exit from your premises.

It’s also possible to make provision of visitor’s details a pre-requisite of organising an ‘external meeting’ to feed into your track and trace measures.

Educating visitors on safety protocol before arrival is also important – more on that in a bit.

We also like to recommend that our customers incorporate the presence of hand sanitisers and any traffic flow as part of their interactive workspace booking floor plans.  This will help reinforce the safety measures you have put in place and put minds at ease.

Prepare visitors prior to arrival

Visitors will also need to understand and abide by your health and safety rules while on your premises.  Again, you could use something like Microsoft Forms to achieve this, and:

  • Convey visitor procedures
  • Securely capture any pertinent personal details (subject to your pre-existing governance protocol)
  • Record consent to limit liability

Pro tip: Industries with more complex visitor protocol may prefer using LMS365 for its comprehensive training capabilities.

Conclusion

Returning to the workplace is going to be a challenging adjustment for many.  With the right tools and planning, however, we can ease that adjustment significantly, protect our most valuable assets (our people), and minimise the anxiety of returning employees.

You can reduce the costs and overheads of introducing COVID-19 safe provisions.

Perhaps even more importantly, we can begin the transformation to a new and better ‘normal’ that embraces the flexibility of the workplace of the future.

Covid-safe workspace booking

Read more about using resource booking and learning management tools to support a secure return to the office.

Many workspace booking systems offer the ability to book and locate a workspace via an interactive floor plan.

An interactive floor plan typically comprises a series of graphics depicting your office layout floor by floor (or area by area), overlaid with an intelligent and dynamic booking element that uses ‘hot spots’ and colour coding to show free/busy status, along with pinch and zoom, point and click interaction.

Many systems also support the ability to book a socially distanced desk. Some systems can even identify the location of co-workers that have booked desks on the same day, enabling you to book a desk that’s close by for optimum collaboration.

In short, floor plans are a great way of doing things, as they give your workforce at-a-glance visibility of what workspaces are available on the day they want to come into the office, and where the workspace is located.  I for one, am keen to find a desk that’s close to vital services, such as the coffee area, printers and the loos!

Regardless of which booking system you select – or even if you simply want to use printed maps in your reception/lobby areas – here’s some top tips on how to create the best floor plan graphics to use as the basis of your workspace booking system:

1. Put yourself in the shoes of the observer

Before uploading a map into your system, check it’s the right (and logical) way up.

A key thing to bear in mind is that conventions for orienting a map or architectural diagram can vary.

For static ‘geographical’ maps, north is always up.  If you’re depicting objects like buildings, the convention should be to show the main entrance of the building at ‘the bottom’ of the map, regardless to where north is.  Plans for new builds, however, can tend to follow a ‘north equals up’ convention.

Another consideration is context.

If your booking system is to be displayed on a big screen in your main reception, then our best practice guideline is to create a ‘heads up’ experience for the viewer.

By this I mean, if meeting room ‘A’ is shown on the left of the floor plan, the room itself should be physically ‘off to the left’ of the screen it’s displayed on.

Covid has, however, changed the whole ‘touch screen in reception’ experience. 

Now, given that most bookings will be made remotely from home or from a mobile device, the best strategy is to orient your floor plan according to the most typical ‘end user experience’ of entering the office.

This means orientating the map with the main entrance at the bottom of the screen (and clearly labelling any other entrances – e.g. Car Park Entrance).

2. De-clutter (don’t just use a default CAD diagram)

CAD diagrams of your office are great for the facilities team as they show details of cabling and plumbing and provide accurate measurements for occupation planning and so on.

Showing the detail of every stall in the loos and every stick of office furniture is too much information when you just want to book a desk.

Avoid floor plans that have far too much detail.

Tips for simplifying your maps are:

Focus on just the basics.  Drop the details and leave behind just the components that will help your workforce select, and then later find, their chosen workspace.  This means paring it back to:

  • The basic office shape
  • Entrances & exits
  • Lifts & staircases
  • Desks & numbering*
  • Storage for personal effects (important where staff no longer have a dedicated desk)
  • Meeting rooms & names*
  • Coffee areas (everyone knows where these are)
  • Loos (ditto)
  • Copying/scanning equipment
  • Recycling points
  • Accessibility
  • Features & attributes of the desk, such as:
    • Standing desk
    • Docking station
    • Multiple screens
  • Likewise, facilities available in a meeting room, such as:
    • VC equipment
    • Flip chart
    • Smartboards

Strip away the detail using your CAD package. It may be possible to go back to the originator of your CAD drawings and get them to ‘turn off’ the layers of detail you don’t need, and just leave you with the elements that are required for the job in hand.  Refer to this article for an example of how to achieve this in AutoCAD

Use icons where possible. Instead of drawing every cubicle in the loos, just put the relevant symbols in place. And there’s no need for a legend if your chosen symbols are recognisable.

3. Be prepared to re-draw your CAD floor plan from scratch

Our top tip here is to be prepared to re-draw your optimal floor plans from scratch, using your CAD diagrams as a guide.

Why?

Often access to the original CAD application and drawings is difficult.  Although you may have a PDF version of the CAD diagram, being able to access the individual layers and disable them is either a) impossible or b) can take an inordinate length of time.

Another reality is that you may only have access to a rough copy of an original CAD diagram that’s been copied, scribbled on and re-drawn several times over.

Below is typical of what we might be given to work with.

In this case the client didn’t have access to the original CAD diagrams and many ad-hoc changes had been made over time anyway.

The resolution was poor and you’ll notice that the main entrance to the building is depicted at the top of the diagram, so the map actually needed to be rotated by 180 degrees and recreated from scratch in order to be legible and make logical sense to the viewer.

By redrawing your maps you will benefit from:

  • A clearer visual for staff
  • A much smaller file size that will render quickly and cleanly on any browser or mobile device

Scalable vector graphic (SVG) files in particular are very efficient file formats to work with and enable rapid zooming in and out without loss of resolution.  Even if your chosen workspace booking platform works with jpgs, we recommend creating your original graphic in a vector diagramming application as this will make it easy to go back and make any amendments in the future.

Tips for creating your vector graphic floor plans are:

  • Use a vector diagramming package such as Adobe Illustrator or Inkscape (available free online)
  • Start with an initial page size/format that matches in with your typical viewer’s device.
    •  If this is the desktop, then start with 1920×1080
    • If this is a mobile display, start with 414×896
  • Import any existing floor plan graphic you have as a starting point
  • Scale it on the page to be a large as possible
  • ‘Lock it in place’
  • Start ‘tracing’ over your floor plan, adding just the basics**
  • Use copy and paste, step and repeat to build up key components, like blocks of desks.

You’ll quickly build up a floor, and then with a bit of luck, you’ll have similar layouts that repeat from floor to floor.  At the very least, the building footprint, stairs, lifts and WCs are often in the same location across all floors in a building!

Before:

After:

4. Don’t be afraid to use artistic licence

Just like the award-winning design for the London Underground map, helping your workforce choose and find a workspace does not demand a slavishly accurate rendition of your actual floor plan.

Believe me, individuals will NOT be out with their tape measure with a view to calling you out on a discrepancy of real-life VS your electronic floor plans.

For this reason, you may wish to employ the following techniques to aid visibility:

  • If your default layout is landscape in format, but your building is long and skinny, simply make it ‘wider’ than it is in reality. This will allow you to use larger proportions for workspaces and labels.
  • Reduce the size of insignificant features like a long connecting corridor

5. Pick up on design cues & use colour to ease navigation

If there is a strong design element to your office, then reflect this in your diagrams to aid familiarity.

For example, we have depicted such navigation ‘aids’ as:

  • Reflecting the different coloured carpets used in each zone.
  • Labelling ‘external landmarks’ (for example, a customer in Canary Wharf wanted to help staff navigate by depicting the view out of each window (HSBC, O2, etc)
  • Picking up on décor such as different coloured meeting rooms

Ultimately, we always recommend you reflect any corporate colours and fonts that reinforce your company brand.

TIPS

  • Avoid over-use of the colours red and green. Red, green (and often amber) are the colours that are typically used to show the free/busy status of workspaces on your floor plan.  It’s therefore a good idea to avoid use of these colours to avoid confusion.
  • Avoid design by committee. Whilst it’s a good idea to get input from the various different stakeholders in your company, reflecting everyone’s views in the design process can result in a lack of simplicity.

6. You may need to review numbering and naming conventions

This subject is a whole new conversation again.  Bear in mind that the labels on CAD diagrams may not relate to actual meeting room names in use.  Also many of the customers we work with that are implementing desk booking systems don’t already have a desk numbering system.

Once you have devised your optimal desk numbering system, you’ll need to individually number each workspace, but you don’t necessarily need to apply a number to each desk shown on the interactive map.

Covid-secure workspace booking

Are you planning a ‘Covid-secure’ workspace booking system? Here’s 4 top tips when it comes to how you go about identifying your Covid-secure desks.

Your workspace booking floor plans are a great opportunity for you to reinforce your Covid-secure messaging and precautions to provide reassurance to your workforce.

In addition to any built-in Covid secure capability your booking system has, such as automatically blocking off adjacent desks when you make a booking, consider adding the following:

  • Traffic flow signage
  • Hand sanitising stations
  • Departmental zones
  • Cleaning stations & contact points

Other capabilities you should look for in a Covid-secure workspace booking solution include:

  • Self-certification of staff members when they book workspaces
  • Authenticated (yet contactless) check-in (this will allow you to track exactly who’s used what workspace)
  • The scheduling of between-use cleaning
  • Policies that govern who can book what spaces when (and how often) – the subject of our next blog
  • Capture of information to support contact tracing
  • Registration of visitors and safety instructions

Conclusion – It’s Worth Putting in the Effort

Making your office floor plans clear, informative and great looking will be a good investment on your part:

  • By helping staff members choose and book their optimal workspace, that’s near the resources they need and has the attributes they desire, they will be as productive as possible when they’re in the office.
  • It will allow you to demonstrate the precautions you are taking to keep your workforce safe and help put minds at ease as they return to the office.
  • It’s a very visible service, and as we get back to the ‘new normal’, may be seen by visitors to your office – not just your own workforce.  Done well, it will convey a slick and professional image for all concerned.

See our meeting room & hot desk booking solutions in action!

There’s many other things to consider when implementing systems designed to streamline your room & resource booking systems, contact us to find out more.

Essential has worked on some of the largest Public Folder migration projects in the world.  Here’s a few tips from our gurus:

A few years back you didn’t have an option to migrate your legacy public folders to Microsoft 365 – in fact public folders on-premises were to be end-of-lifed.  SharePoint was initially tabled as an alternative, but this didn’t ‘wash’ with a lot of Microsoft customers because it didn’t offer the same functionality and was over-complicated.

Microsoft quickly changed its position (no doubt following uproar from lots of disgruntled customers) and now you can take advantage of modern public folders – a service that seems to be hanging together reasonably well and growing bigger in capacity all the time.  It’s now 100TB in total – it started out at 2.5 TB and then 50TB so it’s always worth checking here Exchange Online limits – Service Descriptions | Microsoft Docs!

As you might imagine, there are some caveats, clean-ups and other considerations that come into play if you want to make the move.

But first off, it’s worth getting a bit of background on the modern public folder construct vs traditional public folders:

The Modern Public Folder service is very different from the Public Folder database architecture in an on-premises environment.  It basically uses regular mailboxes that are automatically linked together and load-balanced (for Microsoft 365) as your Public Folders grow in size.  Being regular mailboxes they also benefit from being part of data availability groups (DAGs) instead of having to undergo painful public folder replication.

Here’s how the modern public folder to Microsoft 365 architecture works:

  • You kick off with a single, Primary Public Folder (PF) mailbox (which can grow up to 100GB in size)
  • Microsoft 365 detects when a PF mailbox is approaching the 100GB limit and uses an auto-split feature that creates a linked Secondary PF ‘overspill’ mailbox.
  • As the next mailbox fills up, another PF mailbox is added and content is automatically re-balanced across all the mailboxes.
  • This expansion continues until you hit an overall limit (at the time of the last update to this article it is 1,000 public folder mailboxes and 100TB in a single Microsoft 365 tenancy).
    See this page for the latest info: https://technet.microsoft.com/library/exchange-online-limits(EXCHG.150).aspx
  • A PF hierarchy is maintained alongside the PF contents in the Primary mailbox.
  • This hierarchy is updated to reflect the new location of items as new PF mailboxes are added and as content gets ‘re-balanced’ across the available mailboxes.
  • Read-only copies of the PF hierarchy are also stored in each of the Secondary PF mailboxes and these are kept in sync with the Primary using Incremental Change Synchronisation (ICS).

The key thing to note that is that as far as users are concerned, although the Public Folder to Office 365 mail comprise multiple, ‘lashed together’ mailboxes, they can be viewed and navigated as a single, logical entity.

This is a really great PowerPoint by MVP Peter Schmidt that describes the whole thing in more detail:

https://www.slideshare.net/petsch/modern-public-folders

See also this Microsoft document for details: https://docs.microsoft.com/en-us/exchange/collaboration/public-folders/limits?view=exchserver-2019

Planning Your Migration

Can you migrate?

If you’ve already updated to using modern PFs on premises and are using Exchange Server 2013 CU15 or later, Microsoft has a public folder migration solution using batch migration scripts as described in this article:

https://docs.microsoft.com/en-us/exchange/collaboration/public-folders/migrate-to-exchange-online?view=exchserver-2019.

If you are using ‘old school’ PFs (aka legacy PFs) hosted on Exchange 2010 SP3 RU8, you can follow these instructions for batch migration.  

https://docs.microsoft.com/en-us/exchange/collaboration-exo/public-folders/batch-migration-of-legacy-public-folders?view=exchserver-2019

Whichever version you’re migrating from you’ll need to run quite a few separate scripts (including a final synchronisation and switch which requires downtime) which means it can be quite complicated to use.


Do an Inventory and Have a Clean Up

Some of our customers store vital customer records in PFs.  They also have a lot of rubbish in them and migration is a great opportunity to do a sort out.

Start by doing an inventory of your PFs at a ‘high-level’, and get statistics such as size, item count, owners, permissions and last accessed dates.

In order to make solid and defensible decisions around whether content can be deleted prior to migration you’ll need to do a LOT of deeper digging, however gathering initial meta-data can give you some excellent pointers.  For example:

  • Removing empty and duplicate folders can be a quick fix.
  • Orphaned folders with an old last accessed date are a very obvious candidates for a clean up.
  • Knowing the owner of a PF (assuming it’s not ‘Administrator’) can help signpost who you need to contact in order to see if content can be disposed of.

As ever with records disposition decisions, seek to get the relevant data custodians to call the shots – don’t go it alone!

Bear in mind that a potential downside to deleting or excluding older/stale contents from your migration is that you could create an eDiscovery headache later. For example, an HR dispute may refer back to employment terms and conditions, pension fund arrangements, etc, that were published decades ago.

Analyse Your PFs for Potential Glitches

Given the inherent differences between the architecture of old PFs and Modern PFs, you’ll need to spend some time eliminating things that will upset the migration process. For example:

  • Check for stale permissions
  • Check there are no orphaned PF mail objects or duplicate PF objects in Active Directory
  • Check PF names – syntax errors in your legacy PF naming convention can cause problems. For example:
    • If the name of a PF contains a backslash () it will end up in the parent PF when migration occurs.
    • Trailing whitespaces within Mail enabled PFs and commas in the Alias field will also create synchronisation problems.
  • Check all mail enabled folders to see that they have the right proxy address.
  • If you have any forms, these need to be exported and re-imported into Office 365
  • If users have PF ‘favourites’, they will need to document these before you cut over, as they will disappear

Chunk Up Your Legacy Folders to Slot Nicely into the New Separate Mailboxes Model

As we said earlier in this article, Office 365 performs an auto-split and load-balancing function as PFs approach 100GB in size, but this process can take up to two weeks to complete.  This is not usually a problem when you are populating a PF during ‘normal use’, but when you’re in a midst of a wholesale migration, you’ll be chucking data into Office 365 PFs at a rate of knots, and Office 365 can’t recalibrate itself fast enough.

Common to all migration approaches, therefore, is the need to take the Office 365 PF size restriction of 100GB per mailbox into consideration and effectively run scripts to ‘chunk up’ your PFs into separate PFs that are less than 100GB in size before you start your move.  We suggest you check that your ‘chunks’ are split according to logical subfolders.

Don’t overlook that fact that some of the items in PFs may be archived, as this will not only impact how you do your migration, it will also impact your sizing analysis (as shortcuts to archived items can be a fraction of the actual item size).   Check the message class to do this – e.g. IPM.NOTE.EnterpriseVault.Shortcut

There are many other considerations to take on board to ensure the best outcome post-move, such ensuring optimum retrieval times by putting PFs in a geographic location that’s near to users that will be accessing it.  Ensuring the number of people accessing PFs is kept below 2,000 per mailbox is also recommended.

Post-move you’ll need to do lots of checking and you might also need to re-mail-enable mail-enabled PFs post migration as this attribute might not get migrated.

You can find other considerations here:  https://technet.microsoft.com/en-us/library/dn957481(v=exchg.160).aspx

Find a third-party tool or a migration partner.

There’s a few tools around that can help you with your migration and the best ones start by enabling you to do an up-front analysis of the state of your PFs so you see (and address) what might ‘trip you up’.

The one we particularly like also has a neat algorithm that lets you map your current public folder hierarchy into new modern public folder arrangement.

Another area where you might need assistance is if you’ve been archiving public folders in the past, for example, using Enterprise Vault or EAS.   At a push you can export archived content to PST files and use these as a mechanism for uploading on-premises PFs into Microsoft 365, but you need to know what you’re doing when it comes to splitting your PFs into ‘mailbox chunks’.

Get in touch with our team for a chat to see if we can help with your public folder migration (or at least point you in the right direction).

Let us migrate your Public Folders to Microsoft 365 (or elsewhere!)

We can simplify your Public Folder & Public Folder Archive migrations – or help you migrate to alternative platforms like Azure  Get in touch to discuss your options.

The ‘need for speed’ has always been essential in today’s highly competitive world, and the pandemic has called for even greater pace and agility on the part of businesses as they fight to adapt – and hopefully thrive – in these challenging times.

Just before Christmas 2020 a leading UK estate agent went live with its Microsoft Teams and SharePoint based learning management system from Essential.

Keeping its staff up-to-date on safety guidance and other changes in the housing market was vital, and speed was ‘of the essence’.

Up & running in 4 weeks (*or less)

For this particular customer it took just over 4 week to progress from ‘solution selection’ to rolling out their first training courses to their 1,800+ workforce with our learning management software.

A big contributor to their rapid deployment was the fact that the LMS we work with is specifically developed to run in the Microsoft Teams (or SharePoint)| environment.  This significantly accelerates the job of setting up learners and managing content and access, with services that include:

  • Learner enrolment to courses according to existing AD groups
  • Access management & content protection according to already defined security policies
  • Support for SharePoint hub sites enabling connection of related content & common search, navigation & branding
  • Super-easy set-up of existing training content, including SCORM

The ‘not so good’ news …

The bad news (for us, at least) is that this particular customer intends to switch to a different LMS that is part of a much bigger all-encompassing ERP solution at a later date.

They confessed to this on the outset.  Their explanation was that the timelines involved rolling out their originally planned ERP system were much longer than the HR & Learning team wanted to wait….and they needed to get going with training asap.

This is the beauty of on-demand, software as a service and pay-as-you-go licensing**.

The other factor that made this ‘throw away’ strategy possible was that the investment on the part of their workforce in getting to grips with the LMS would be minimal.  This is down to the fact that Essential’s solution presents itself as a seamless extension to an existing Teams and SharePoint environment.

I guess their rationale is that a pain-free adoption will make moving to a new LMS in the future less of an ordeal for end users.  Easy come, easy go, if you will.

Our LMS team secretly thinks that they’ll get on with it so well, they’ll want to stick with it in the long run….we’ll watch with interest.

Related subjects:

To find out more about the benefits of delivering your learning management system in Teams & SharePoint, get in touch>.

* We are working on another project right now for a recruitment agency that will roll out within 2 weeks of purchase.  Other recent projects have run at 18, 22, 30 an 35 days from purchase to implementation. Projects typically commence within a week, installation within 2 weeks and training within week 3.

**STOP PRESS – a year later and the company has renewed its subscription and is still going strong with our LMS and no plans to move on.

Are you, like many organisations, looking at how you can replace your previously ‘in person’ training with an on-line service?

The technology we have available in platforms such as Zoom and Microsoft Teams video conferencing makes the delivery of content relatively easy.

And, let’s face it, video conferencing removes many of the costs and logistical headaches normally associated with getting a bunch of delegates together:  There’s no hotels and travel to book, no catering, no social outings or icebreakers to orchestrate…

Recently I helped a law firm convert some ‘in-person’ course work into an ‘eLearning format’ hosted on Microsoft Teams, but I came a bit unstuck at the part where course delegates needed to split into smaller groups to work through an example case.  Whilst it is possible to ‘fudge it’ using Teams channels, it isn’t ideal and takes a lot of preparation as you will see in this Microsoft article.

Microsoft Teams Breakout Rooms to the rescue!

Now rolled out, this Teams feature is designed to support exactly the scenario where you need to split out and reconvene a training session (and many other scenarios, such as team building and brainstorming) using virtual breakout rooms.

Once the breakout rooms are started, the organiser (or tutor) can virtually leap from room to room to check in on progress and provide assistance (delegates have the ability to get their ‘tutors’ attention via private chat or specifically requesting them to join).  Up to 50 virtual rooms can be created – which sounds exhausting.

At the end of the allotted time (you can set a countdown timer and send a ‘5 minutes left’ message), the organiser can also close the virtual rooms and ‘pull’ everyone back into the main room.

There’s a good ‘blow by blow’ description of how to use breakout rooms here, but before you get going, here’s just a few tips to bear in mind based on my work with breakout rooms so far:

A few top tips

1. Have an idea ‘up front’ who you want to be in each team

In the first release* you can’t pre-configure your breakout rooms and who’s going to go in them.  You can only do this once you’ve started your first meeting. 

So the first bit of advice here is that if you want to be in control of who goes into what team (for example, you want to ‘mix up abilities’), have a rough plan as to how you’re going to split folk out in advance.  

For example, if you have clear-cut learning ‘tracks’ (a great example is where you might want to deep dive into ‘sales’ or ‘technical’ content in a conference), it’s a good idea to have all the relevant names grouped accordingly, ready to refer to.

Otherwise your delegates are going to be sitting, watching you peer at your screen and scratching your head for a long time whilst you pick and choose your breakout team members.

By all means, if you don’t care who’s in what team, you can automatically assign delegates – you just need to specify how many rooms you want.

By default, your rooms are numbered 1,2,3 etc but it’s a good idea to assigned names that are descriptive or ‘fun’, and as in ‘real life’, getting delegates to choose their ‘group name can be part of an icebreaker session.

2. Get any documents for your teams ready in advance

Each virtual room can be used to share files, whiteboards, etc. and the individuals involved can connect and follow-up after the meetings, and access all the resources worked on.  This includes the ability for the groups to present the outcomes of their breakout sessions to the rest of the team, when everyone is reconvened.

Again – to avoid waiting around, have your individual ‘handout’ documents in a folder on your desktop or in OneDrive ready before the meeting commences.  Once the rooms are assigned will need to add your documents into the individual breakout room chats (after which the participants in that ‘room’ will be able to work collaboratively with the file(s) in question).

Note that you won’t be able to upload the same file for use in different breakout rooms (Teams will tell you that the file is already in use).  You’ll have to create separate copies.

Also you can’t drag and drop a folder of files – you’ll need to move individual files.

3. Practice in advance

It might seem easy when you read the instructions, but as with Teams Live Events, you’ll need at least a few dummy runs with ‘tame’ colleagues to become proficient.  Note that you’ll need a minimum of 5 participants on a call (otherwise the breakout rooms feature won’t be available to you).

Also setting expectations to delegates on the call is important, otherwise the experience ‘on the receiving end’ can be confusing.  To help with this, it’s a good idea to have someone in each breakout room that knows what’s going on and can advise the rest of the team accordingly.

Will features like this in Teams ever get to replace classroom training?

In short, no.  But until the time we can get back to classroom-based scenarios, we need to make it work for us.  Also I predict we will see a lot more blended or ‘hybrid’ training, which combines distance course work with in-person sessions.

The good news is that there’s lots more features to come in Teams that can be used to transform how training can be delivered to your workforce.

Along with the other recently-introduced Teams features such as the ability to view meeting participants in a shared background (as though they’re in the same room), live transcriptions (including who said what) and better powers for the meeting organiser and presenters when it comes to muting delegates, Microsoft is working hard to make your virtual workforce feel better-connected and better-supported.

For more details on breakout rooms, this video is a great resource.  Fast forward to minute 13:30 for information on future enhancements when it comes to managing breakout room members and inviting the different presenters that might be involved in delivering content for each ‘room’ or ‘track’.

If you are planning to deliver remote training to your workforce and would like to find out how we can help ‘boost’ the capability of Teams, with services that include converting and migrating legacy training content, tracking how well-engaged delegates are with the content you deliver (e.g. compliance training and automated on-boarding for new starts) and providing a great Netflix style learning content experience that leverages Teams collaboration, get in touch.

*You can track enhancements to the breakout rooms feature here.

Motivate, re-train, track progress:

Discover how your enterprise can build on native SharePoint & Teams collaboration capability to create a learning academy for your remote workforce

Having a naming convention for identifying meeting rooms in a large organisation can be a challenge – especially when there’s 100’s of different rooms, floors, room sizes, room types, different locations and so on.

An example we saw at a customer site recently incorporated the following attributes into the actual room name:

‘RESOURCE TYPE’ + ‘LOCATION CODE’ + ‘BUILDING CODE’, ‘FLOOR NUMBER’, ‘ROOM NUMBER’, ‘CAPACITY’, ‘AVAILABLE EQUIPMENT’, ‘ACTUAL ROOM NAME’ resulting in, for example:

ROOM THAMES VALLEY PARK BUILDING 5 GROUND FLOOR 0.01 96 AV VC Chicago 1

Although this might be OK for ‘behind the scenes’ reference purposes, if you are planning to use room panels or interactive floor plans to streamline room and desk bookings, our advice is to present end users with a less onerous name.

Apart from being more aesthetically pleasing on a screen, it’s obvious the resource is a room, and hopefully the staff member will know what building they are in.

So really, the only relevant information is the actual room name ‘Chicago 1’ and its booking status (free/busy). Information like the room capacity and facilities can be included elsewhere on the screen – and not be part of the name.  

Here is a nice example of how a simple room name has been extended to the actual design of the room itself – all of which helps enhance the staff (and visitor) experience.

What about desk numbering schemes?

Likewise for identifying desks, you might contemplate giving all your desks a unique number, instead of using the floor level or wing as part of the desk number.

Why?

To give you an example: I spent ages hammering on the door of a hotel room wondering why my partner was refusing to let me in.  The hotel in question numbered its rooms starting from 1 on each floor, which did not account for the fact that I inadvertently got out of the lift on the wrong floor! Thankfully the occupant of the (wrong) room was out!

An intuitive numbering scheme that by design accommodates the ‘floor level issue’ is to prefix the desk number with the floor number.  E.g. 423 would be desk 23 on the 4th floor.

A further tip if you’re looking at desk booking (and therefore desk numbering) as part of your COVID-19 return to work strategy is to number ALL of your desks, not just those desks that are suitably distanced.

We have seen (and averted) more than one project where the intention was to only give the ‘safely distanced’ desks a consecutive number.  The problem with this is two-fold:

  1. It is not a future-proof strategy as distancing requirements change
  2. It will not lend itself to a flexible workspace booking system in the future (this being an inevitable outcome of the pandemic, as workspaces shrink and evolve to support a now ‘hybrid workforce’).

See our room & desk booking solution in action

There’s many other minor (and major) things to consider when implementing systems designed to streamline your room and resource booking systems, contact us to find out more.

The mute story so far

As a Teams meeting participant, the mute button has proved to be a pretty useful feature during lockdown to mask out the various screaming baby/dog barking at the Amazon delivery guy/cheese-and-Marmite-toastie-munching interruptions.

And, it’s comforting to know, that if you have gone ‘on mute’ but later need to chip in with your two-penneth’s, there’s an AI feature that automatically detects that we’re talking mainly to the dog to remind us to unmute.

If you’re using Microsoft Teams as a training platform, however, the power of the mute button for role of the teacher has been sadly lacking.

So, for example, did you know that anyone can mute anyone else in a regular Teams call?    If there’s more than 3 meeting on a call, you’ll see a ‘Mute All’ button.  You can also mute individual participants ‘at will’.

As you might imagine, many a student has played this prank on their lecturer or fellow students in a Teams-based lesson, if only to alleviate the boredom of lock-down.

Additionally, even though the meeting organiser can mute all when they start the meeting to as to avoid late-comers disturbing a meeting in full flow, participants have always had the option of unmuting themselves whenever they wanted to.

Coming soon to a Microsoft Tenant near you

Initially rolled out to the Edu sector, and being generally rolled out through September/October 2020, there is a new ‘Hard Audio Mute’ feature that will give you the ultimate power to get folk to shut up.

This is how to set it up.

  1. You start by creating your Teams meeting and inviting the attendees:

Teams Mute Button

2. Next, you Edit your Teams meeting, where you get to see your original meeting details along with a new ‘Meeting Options’ link:

Teams Mute Button

3. The meeting options now include an option called ‘Allow attendees to unmute’:

Teams Mute Button

4. The other thing you’ll need to consider is who, besides yourself, needs to be able to present on the call (as presenters, by definition, need to be able to speak!).  In our example here, it’s just me:

Teams Mute Button

5. Attendees joining this meeting will now not be able to unmute themselves – like poor Charles here!

Teams Mute Button

6. His unmute option will be greyed out, and he will need to ‘raise his hand’ when he wants to speak (I love the power).Only myself as the meeting organiser (or a meeting presenter if I had specified any) can enable him to talk to the rest of the team.  To do this, I will need to raise Charlie’s status to ‘presenter’.Once I’ve made a presenter, he’ll be able to unmute himself and start shouting at me:

Make presenter in Microsoft Teams Mute Button

7. Once I’ve let him have his say, I can set him back to an attendee to make him permanently muted again:

Make attendee in Microsoft Teams Mute Button

So there you have it!  The Teams platform is being enhanced all the time and the fact that it is widely used in the education sector is a huge influence when it comes to enhancing it for the purpose of collaborative training.  Watch this space for more functionality.

The Teams platform

Read more about making the most of Teams for your learning management & training

Setting up the concept of bookable desks – otherwise known as ‘hot desking’ – is more than just a case of designating desks and making them ‘bookable’.

A lot more.

When, some years ago, housing association, Notting Hill Genesis, set up its hot-desking scheme as a way to reduce its office costs, they thought their cutting-edge workspaces, complete with docking stations, storage lockers and a slick booking system, would be enough.

They were wrong.

The housing association’s staff were not happy with the new arrangement.

According to Jenny Quigley, project manager at the time, “Staff were taken aback when we told them they wouldn’t have fixed desks anymore, even though we were trying to provide more flexible facilities. Some even had to speak with management before they got on board with our proposals. In retrospect, the cultural change aspect of the project would have benefitted from some external mediation.”

In the case of Notting Hill Genesis, pointing out benefits of the new regime, including the ability to reduce personal expenses by being able to travel to a nearer office, and being able to work from home where it was possible, smoothed the introduction.

While it’s true, in the past, the resistance to losing one’s own desk space would have been a barrier that needed sensitive handling, COVID-19 has effectively removed this ‘human barrier’.

Safety remains a no. 1 priority

In a bid to prepare for several ‘return dates’ that came and went, many facilities teams prepared their offices for social distancing by clearing down desks of personal belongings.

This step effectively ‘forced the desk ownership situation’.   

Now, with the pandemic still not ‘over’, the over-arching priority for businesses remains that of ensuring a safe working environment as its workforce returns to the office.

Hybrid working = smaller offices

As the pandemic lifts, the writing on the wall* is that the concept of everyone coming into the office on a daily basis will be a thing of the past.

This means much smaller offices, alternative workspace arrangements (such as work hubs), and monthly team meetings in different hired venues, we be amongst the new trends.

Another stark reality is that many organisations will need to reduce their rental costs or sell off property in order to survive.

For example, drinks company Fever Tree converts office into bar recently converted half of its London office into a bar, and many of the other enterprises we speak with are electing not to renew leases on certain offices and sell properties where possible.

The savings are highly tangible: When it introduced its desk booking scheme a few years back, Genesis Notting Hill reduced the number of offices it had by 43%, resulting in year on year accommodation savings of 1M.

Hybrid working = a more receptive audience to change

The ‘good news’ for organisations having to shrink their available workspace and introduce a booking scheme, is that having experienced the many benefits of home working (there are obviously downsides), staff members will be more open to this change.

In short, the trade-off of zero commute time and a better work-life balance will mean that the typical resistance to ‘hot desking’ we’ve seen of staff losing their own desk ‘shrine’, complete with (now wilted) pot plants, favourite chair and drawers full of god knows what, will evaporate.

Not having a fixed desk booking system does bring a whole batch of other challenges, such as how to be near to co-workers in the same team, how to facilitate ‘on the job training’ (especially for new starts), locating work colleagues and having ‘ad-hoc’ meetings, but all these are addressable with the right technology and careful consideration.

Work is something you do, not a place you go

Enterprises are now seeking to use their office space in new ways that deliver tangible value to individuals, teams, and the company as a whole.

This could be a mix of solo working spaces that enable individuals to concentrate, shared spaces for collaboration with team members and video conferencing suites and booths.

Although there will instances where individuals with certain roles need a dedicated desk, the days on which this desk is not in use (e.g. during annual leave), organisations can use technology to release this resource into an available pool (known as reverse hoteling).


?>